Android AVDとemulator (SDK 1.5)
Android 1.5 Early Look SDK解説の続きで、emulatorについてです。
先日Android 開発しない人のためのエミュレータインストール記事を書いたのですが、emulatorの仕様が変わって、ダウンロード、インストール、すぐに実行ができなくなってしまいました。新しいエミュレータを実行するには、AVDを作成するためにコマンドラインを起動する必要があり、少し敷居が高くなってしまいました。
とりあえず動かしたい人へ
細かい話はいいので、とりあえずemulatorを動かしたい人は、以下のコマンドを打ってください。
$cd C:\android\android-sdk-windows-1.5_pre\tools$android create avd -n normal -t 3 -c 16M$emulator @normal
AVD(Android Virtual Device)
emulatorを動かすには、Android仮想デバイス(AVD)を作成し、emulatorの引数として渡します。
SDK1.1用仮想デバイス、SDK1.5用仮想デバイス、サードパーティライブラリが入っている仮想デバイス(例えばNTT Docomo用の特殊ライブラリが入ったデバイス)を用意(そんなものは現在ありませんが)し、AVDを切り替えることで、エミュレータとしては汎用的に動作をする事となります。
androidコマンド
AVDファイルは、新しく用意された、”android”コマンドを使用して作成します。
$android create avd --name my_avd_name --target 1
nameは自由な名前を付けます。
targetに指定できる値(数字)は、android list targetsコマンドで取得できます。
android list targets出力
C:\android\android-sdk-windows-1.5_pre\tools>android list targetsAvailable Android targets:[1] Android 1.1API level: 2Skins: HVGA (default), HVGA-L, HVGA-P, QVGA-L, QVGA-P[2] Android 1.5API level: 3Skins: HVGA (default), HVGA-L, HVGA-P, QVGA-L, QVGA-P[3] Add-on: Google APIsVendor: Google Inc.Description: Android + Google APIsBased on Android 1.5 (API level 3)Libraries:* com.google.android.maps (maps.jar)API for Google MapsSkins: QVGA-P, HVGA-L, HVGA (default), QVGA-L, HVGA-P
従って、現在使用できる値は、1,2,3の3つとなります。
android createコマンドの引数は以下の物が使用できます。
android create avd出力
C:\android\android-sdk-windows-1.5_pre\tools>android create avdError: The parameters --target, --name must be defined for action 'create avd'Usage:android [global options] action [action options]Global options:-h --help This help. (false)-s --silent Silent mode: only errors are printed out. (false)-v --verbose Verbose mode: errors, warnings and informational messages are prAction "create avd":Creates a new Android Virtual Device.Options:-t --target Target id of the new AVD [required]-c --sdcard Path to a shared SD card image, or size of a new sdcard for the-p --path Location path of the directory where the new AVD will be created-n --name Name of the new AVD [required]-f --force Force creation (override an existing AVD) (false)-s --skin Skin of the new AVD
SDK1.1では、別途指定していたスキンやSDカードは、AVD作成時に指定します。
AVD作成
以下のようなコマンドでAVDの作成が可能です。
Android SDK1.1用
$android create avd --name sdk1.1 --target 1
Android SDK1.5用
$android create avd --name sdk1.5 --target 2
Android SDK1.5 とGoogle Map
$android create avd --name sdk5map --target 3
上記コマンドで作成したAVDは、C:\Documents and Settings\ユーザ名\.android\avd下に作成されます。
SDK1.1の時は、エミュレータは、C:\Documents and Settings\ユーザ名\Local Settings\Application Data\Androidディレクトリを使用していました。この辺りも仕様変更となったようです。
過去に作成したAVDは、android list avdsコマンドで一覧取得可能です
android list avds出力
C:\android\android-sdk-windows-1.5_pre\tools>android list avdsAvailable Android Virtual Devices:Name: sdk1.1Path: C:\Users\gaku\.android\avd\sdk1.1.avdTarget: Android 1.1 (API level 2)Skin: HVGA---------Name: sdk1.5Path: C:\Users\gaku\.android\avd\sdk1.5.avdTarget: Android 1.5 (API level 3)Skin: HVGA---------Name: sdk1.5mapPath: C:\Users\gaku\.android\avd\sdk1.5map.avdTarget: Google APIs (Google Inc.)Based on Android 1.5 (API level 3)Skin: HVGA
エミュレータの起動(コマンドライン)
エミュレータの起動は、AVDを引数に指定します。
$emulator @my_avd_name
従って上記で作成した、SDK1.5用のAVDを指定すると、以下のようになります。
$emulator @sdk1.5
emulatorの新しいオプションは、-help-vertual-device引数を指定する事で取得できます。
emulator -help-virtual-device出力
C:\android\android-sdk-windows-1.5_pre\tools>emulator -help-virtual-deviceAn Android Virtual Device (AVD) models a single virtualdevice running the Android platform that has, at least, its ownkernel, system image and data partition.Only one emulator process can run a given AVD at a time, butyou can create several AVDs and run them concurrently.You can invoke a given AVD at startup using either '-avd <name>'or '@<name>', both forms being equivalent. For example, to launchthe AVD named 'foo', type:emulator @fooThe 'android' helper tool can be used to manage virtual devices.For example:android create avd -n <name> -t 1 # creates a new virtual device.android list avd # list all virtual devices available.Try 'android --help' for more commands.Each AVD really corresponds to a content directory which storespersistent and writable disk images as well as configuration files.Each AVD must be created against an existing SDK platform or add-on.For more information on this topic, see -help-sdk-images.SPECIAL NOTE: in the case where you are *not* using the emulatorwith the Android SDK, but with the Android build system, you willneed to define the ANDROID_PRODUCT_OUT variable in your environment.See -help-build-images for the details.
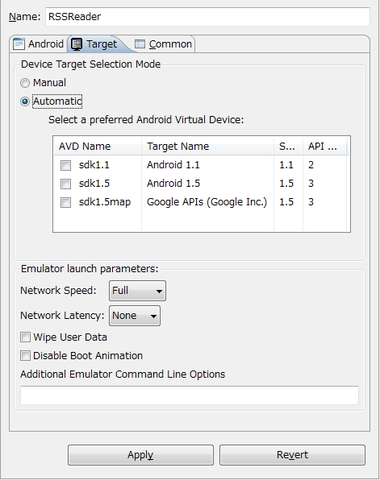
Eclipseからのエミュレータの起動
デフォルト状態では、Eclipseは、”automatic target”モードになっています。
このモードでは以下の順でエミュレータのチェックを行います。
- 既に実行しているエミュレータか、デバイス(USBで接続された実機)があればそれを使います。
- 既に実行しているエミュレータか、デバイスが2つ以上あれば、選択ダイアログを開き、ユーザが選択した物を使用します
- 何も実行されていなければ、ADTは使用可能なAVDを探し、その中からプロジェクト設定にあった物(APIレベルが同じ物)を選択し使用します。
ADT0.9では、Run – Run Configrtationsのターゲットタブにて、マニュアルモードにする事でAVDを直接設定することが可能です。
まとめ
通常実機の方にはSDカードが付属している事を考えると、サンプル的に使うのであれば以下のコマンドでavdを作成するのが良いかと思います。
$android create avd --name normal --target 3 --sdcard 16M
追記
2009/6/15
android list avdsで表示されるリストを追加するには、Android ビルドしたイメージをエミュレータで動かす標準的な方法に詳しく記載しました。(自分でアンドロイドをソースコードからビルドしたとき等に使用します)
ブログ内の関連する記事
ブログ内のSDK1.5に関連する記事
- Android SDK 1.5 (EarleyLook)インストール手順
- Android AVDとemulator (SDK 1.5)
- Android ADT0.9 変更点 (SDK1.5)
- Android ボタンのデフォルト最少サイズ仕様変更の影響(SDK1.5)
- Android Softkeyboard サンプルプログラム
- Dev Phoneファームウェアアップデート手順 (v1.5)
- Android SDK 1.5 r1バージョンアップインストール手順
- Android SDK 1.5 r2 (セキュリティホール対応)バージョンアップインストール手順
- Android 1.5 SDK r3 変更点 iWnnついてます。
- Android SDK 1.5 r3 インストール手順


コメント
コメントを投稿